NicksTools Plugin 1.61 Free Download
Mis Scripts
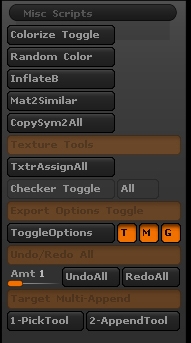
- Colorize Toggle: this script sets colorize (Polypaint) on or off for all your SubTools at once. Toggling them individually can be super time consuming.
- Random Color: This script will assign a random color to each of your subtools. This is useful when rendering a flat color pass so you can easily select your subtools when compositing.
- InflateB: Toggles between your current brush and the inflate brush at max size. This is used to inflate the whole subtool similar to the inflate in the deformation menu.
- Mat2Similar: Fills subtools your active material to all subtools with the same pointcount.
- TxtrAsignAll: This button will assign the currently selected texture to all visible subtools. The subtool must have UVs.
- Checker Toggle: This script will turn on the Checkerboard texture for the current subtool or all subtools if the “All” button is toggled. When the button is toggled off it will turn the checkerboard off or reassign the previous texture. The subtool must have UVs.
- ExportOptions: This script will toggle the Subtool Export Options, Texture, Merge UV Cords, and Sub Group, for all your Subtools.
- Undo/Redo All: These buttons will Undo or Redo multiple times on each visible Subtool. How many times the script Undo/Redos is based on the “Amt” slider.
- Target Multi-Append: First pick the target tool you want all the subtools from. Then press AppendTool will append all the subtools from that target to your current tool.
BPR Geo
- Dynamic All: Use the “On” or “Off” switches to toggle Dynamic SubDivision on or off for all visible subtools.
- ApplyDynamicAll: Commits the Dynamic SubDivision for all visible subtools.
- Array Mesh All: Use the “On” or “Off” switches to toggle Array Mesh on or off for all visible subtools.
- BPR2Geo All: Converts your BPR Geo to meshes for all visible subtools. Use the GoZ switch to automatically send those meshes to your Goz app.
Masking
- Mask Grow: this script will attempt to grow your mask by a fixed polygon ammount. Enter how many polygons you want it to grow by in the slider and click grow.
- PP to Mask: if you have any Polypaint this script will convert it into a mask based on color value with a single click. This is useful if you want a way to preserve complex masks.
- AutoMask PG: ordinarily the brush setting “AutoMask by Polygroup” is a slider. This button toggles between 100 (on) and 0 (off) with a button press. Ideally this button should be pulled into your interface somewhere so it’s handy.
- Mask PG Under Cursor: Requires a hotkey. Will mask the whole polygroup under your mouse cursor.
- UNMask PG Under Cursor: Requires a hotkey. Will unmask the whole polygroup under your mouse cursor.
Brush
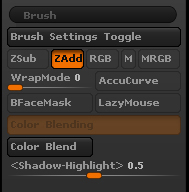
- Brush Settings Toggle: Applies the toggled settings to most of your loaded brushes. A few brushes are skipped based on name. Those include: Mask, Trim, Transpose, Select, Slice, Groom, Zremesher, Zmodeler, Zproject, and Topology.
- Color Blending: Requires a hotkey. Blends your active color with the Polypaint color under your mouse cursor. The “Shadow-Highlight” slider will skew the hue and value towards a lighter or darker color. Higher values moves the color towards a highlight and lower values moves towards a darker color. At 0.5 it will blend between the two colors.
SubDivision
- SubD Lvl All: this script will put all your visible subtools at the SubD level indicated by the slider. This is similar to “All High” and “All Low” in the SubTool menu only with more customization.
- SubDivide All: Subdivides all visible subtools X times where X is the slider number.
- All Minus/Plus: These buttons will go up or down SubDivision levels for all visible based on the SubD Lvl slider. If the slider is at 3 then pressing “All Minus” will take all your subtools down 3 SubD levels from their current.
- 1-9 buttons: Pressing these will put your SubD level at the number indicated. If the mesh has no subD levels then it will be divided that many times.
- H button: Puts the active subtool at the highest SubD level.
- Smart DynaMesh: This script takes the guess work out of getting an acceptable poly density with DynaMesh. The script will create a Dynamesh near the “Target Polycount” slider. Use this script instead of initially pressing Dynamesh then just Dynamesh as normal.
- Match Current: Uses Smart DynaMesh to get a DynaMesh close to your current pointcount.
- Target Polygoncount: Slider used for the Smart Dynamesh. Number is in Millions.
Make SubD Levels
- Make SubD Lvls: Will attempt to recreate subD levels using your current Zremesher settings.
- All Vis: Will recreate subD levels for all visible subtools. This may take a long time.
- AutoDetect: By default Make SubD Levels it will autodetect how many levels you need get back to your current pointcount.
- Projection: Enables projecting details back to the subdivided mesh. Increases run time.
- CapProjection: Enabled to increase speed and performance. Stops projection after a certain pointcount is met. Controlled by the ProjCap PCount slider.
- Relaxed: Applies the Zremesher process twice resulting in a more relaxed topology.
- Delete Source: Enabling will prompt you to delete a “PolyStar” temp object to get rid of the “Delete Confirmation” popup. After this your un-subdivided source mesh will be deleted after the Make SubD Lvls script is ran.
- SubD Levels: If autodetect is off then you can manually set how many SubD Levels you want per subtool.
Material Cycle
- With these set of buttons you can “store” up to 6 materials on the “Material” slider numbers. Start by picking a number and a commonly used Material. Then click “Set Mat.” That Material is now set to the slider number.
- You can either move the slider manually or use the “<>” keys. For best use assign those buttons to hotkeys. To remove a Material from a number you can use the “Clear Mat” button or overwrite it with a new material.
**Note 1: If a number is “blank” the “<>” buttons will not skip it. The Material will not change but you will have to press the buttons to move on to the next number.
**Note 2: Stored Materials must be loaded for the script to assign them to your mesh. Please use Materials in your ZStartup folder or load them before hand.Visibility
- Define Group: Sets a “keyword” that appears in the name of all subtools you want in a group. This keyword is set to the number on the slider.
- Check: Displays the keyword assigned to the slider number.
- <-G/G-> : Buttons to move the group slider up or down. Use these if you want to hotkey changing the group number.
- Hide/Unhide Group: Hides/Unhides each subtool with the keyword that is assgined to the current slider number.
- Send Group to Top/Bottom: Each subtool with the keyword that is assgined to the current slider number is moved to the top/bottom of the subtool stack.
- Add Visible to Group: Will add the keyword from the current slider number to the name of each visible subtool.
- Isolate Group: Checks if the subtool name has a keyword in a group and hides all subtools that are NOT in the same group.
- Hide Above/Below: this script hides Subtools above or below the active Subtool in the Subtool menu. This DOES NOT hide Subtools above or below based on the canvas position, only based on menu order.
- Store/Restore Visibility: when you press “Store Visibility” the current visibility status of all your Subtools are stored. You can hide/unhide subtools any way you want and then recall the stored visibility later.
This is saved in between ZB sessions.
** Note: It is very important you do not add/delete or rearrange subtools after storing. It will give you an error and you will have to store the visibility again.- Set Subtool: Picks a subtool to use in the “Quick Select” and “Quick Hide” buttons.
- Quick Select: Toggles between the current subtool and the one selected with “Set Subtool.”
-
Batch Rename
- Rename: opens a dialog asking for the base name to rename all visible subtools. Optional prefix/suffix will be added to this base name as well as a serial.
- Serial Start: change if you wish to start the renaming serial number to something other than 1.
- Set Prefix/Suffix: adds a word to the start/end of the base name.
- Padding: Optionally add another letter or number before the serial.
- Underscores: Toggles underscores after the prefix and before the suffix/serial.Quick Hide: Toggles the visibility of the subtool selected with “Set Subtool.”
Quick Load/Save
- Load Stored ZPR: This button will load a project stored with the “Open” button to the right.
- Open: This button will open the browser for you to select a project. This button also automatically stores the project you open. So after you “Open” a project once its forever stored until you open other with this button.
- Save 1-3: These buttons will save over the mesh saved with the corresponding “Store Tool” slot. If a different mesh is selected or the mesh has a different name than the one saved a warning prompt will appear. This is so you don’t accidentally Overwrite a file.
- Store Tool 1-3: These buttons will store the current tool you are on. You can have three different tools stored at once. Clicking it again will overwrite the previous save. If you CRTL-Click the button it will display the path of the tool saved so you know which Tool is assigned to which button.
- Load Tool 1-3: These buttons will load the Ztools assigned to the neighbouring buttons.
**Note: To get optimal use out of these scripts I HIGHLY recommend making a custom menu with these buttons and docking it above the “Tools” palette so that it will be close to your other Save/Load buttons.
Save 2 ZStartup
- Set Zbrush Dir: Use this to set the ZStartup directory to save the files too. Example: C:Program Files\Pixologic\ZBrush 4R7 (with no backslash at the end.) This only needs to be done once unless the directory changes.
- Check: Displays the saved directory.
- Auto Rename Copies: If this is enabled, files with the same name will not be overwritten but saved as a copy.
- Save “X” 2 ZStartup: Saves the cosponsoring asset to the correct Zstartup directory.