Linocut Brushes for Adobe Illustrator Free Download
Wondering about printing linocuts without a press? Learn how to make a linocut vector illustration that has the look of a handmade linocut or woodcut design in Adobe Illustrator.
We’ll start by creating woodcut brushes for Illustrator from scratch, then we’ll do a beautiful and simple linocut design. However, if you don’t have the time to do digital linocut art from scratch, we’ve got a solution for you.
Envato Elements offers unlimited linocut and woodcut brushes for Illustrator with your subscription. Find that will save you a lot of time and will give you a professional result, like this one:Scroll down after this Illustrator woodcut effect tutorial to see a hand-picked selection! To find out even more about brushes in Adobe Illustrator, check out my course also on the
What You’ll Learn in This Illustrator Woodcut Effect Tutorial
- How to create the linocut art brushes
- How to create the pattern brushes
- How to save your linocut art brushes
- How to draw the branch for your linocut design
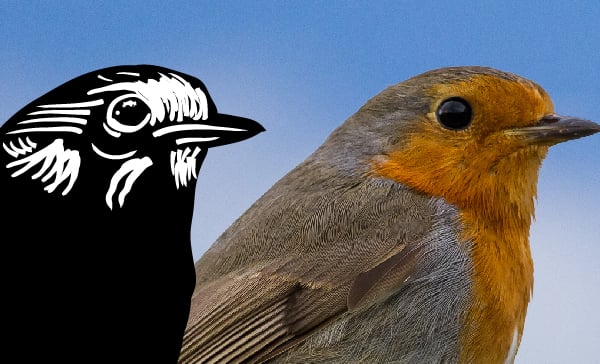
- How to draw the bird for your linocut design
- How to add the finishing touches to your woodcut illustrations
1. How to Create the Linocut Art Brushes
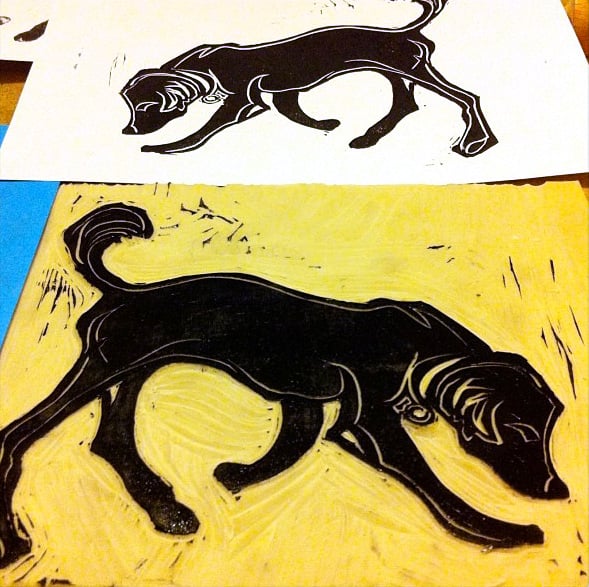
When creating a linocut print, artists use special tools to carve designs into a linoleum block. The raised (uncarved) areas of the block form the image. The carved linoleum block is covered with ink, then printed onto paper or fabric. Because the artist removes material from the block to create the image, this is called a “subtractive” or “reductive” process.
Step 1
We want to mimic the shapes of the cuts that a gouge tool makes. Then we’ll use those shapes as the basis for a set of Art Brushes. To create the shapes, choose the Blob Brush Tool (Shift-B) and double-click it to bring up its options.
An “Accurate” Fidelity setting will result in more detailed and rougher shapes, which is desirable for a hand-carved look. The Variation in size will allow you to draw a stroke that varies in size, depending on the amount of pressure you use with your graphics pen.
Step 2
Draw three or four strokes with the Blob Brush Tool, pressing down harder on one end and using a lighter touch at the other (if using a graphics tablet), resulting in a tapered shape. If using a mouse, double back on one end to make the resulting shape thicker. You can also adjust individual points to modify the final shapes. The Blob Brush is not technically a brush, but it’s great for quickly drawing loose vector shapes.
Step 3
Select one of the shapes you just created, and then click the New Brush icon at the bottom of the Brushes panel. Alternately, you can drag the object into the panel.
Choose Art Brush as the type.
Step 4
In the dialog box, give your new brush a name, and enter the following settings. The Width can be set to Pressure if you’re using a tablet, or left at Fixed if using a mouse. If set to Pressure, you can vary the width based on the percentages you choose in the two sliders. Choose Stretch to Fit Stroke Length in the next section. Below that, make sure the directional arrow begins with the wide part of the shape and ends at the narrow part. Lastly, set the Colorization method to Hue Shift. This is important because we will be changing the color of the brushes in a later step. (Read our separate tutorial for more on )
Step 5
Repeat Steps 3 and 4 with the other shapes to create more Art Brushes.
Step 6
We’ll now create a thin brush to look as if it was carved with a v-shaped gouge. Choose the Line Segment Tool (\) and draw out a horizontal line. Increase its weight to about 4 points. From the drop-down menu in the Control Bar, choose Width Profile 3. You can also access width profiles from the Stroke panel.
Step 7
Create a new Art Brush from this new stroke, as you did in Steps 3 and 4.
Step 8
Keep this stroke selected and apply a Roughen effect by going to Effect > Distort & Transform > Roughen. Enter the settings below.
Step 9
Once again, drag this object into the Brushes panel to create a new Art Brush. At this point, your Brushes panel should look something like the image below:
Step 10
Many linocuts have marks in the negative space—that is, the area around the main subject matter. We can simulate this effect with a few more Art Brushes. Using the Pen Tool (P), draw some simple shapes like the ones in the image below:
2. How to Create the Pattern Brushes
Relief prints, such as linocuts and woodcuts, can only produce one solid color at a time. There’s no way to get a tint or shade of a color in a one-color print. To create highlights, relief printmakers use crosshatching, or a series of small, repeating strokes. For this technique, we’ll create some Pattern Brushes.
Step 1
Draw a few pencil strokes as you did above, but this time, make them vertical.
Step 2
Take the Blob Brush Tool (Shift-B) and connect the pencil strokes at the bottom. The result is one shape, as in the image below:
Step 2
Take the Blob Brush Tool (Shift-B) and connect the pencil strokes at the bottom. The result is one shape, as in the image below: